


Yamaha R6 2003 Fork Seal Replacement
#maintenance
#suspension
12 years ago
The seal replacement process is shown in detail in the video; below are the key points to pay attention to when replacing them.
The diagram of the 2003 R6 fork is shown in the picture below. Most conventional forks have the same or a similar design.
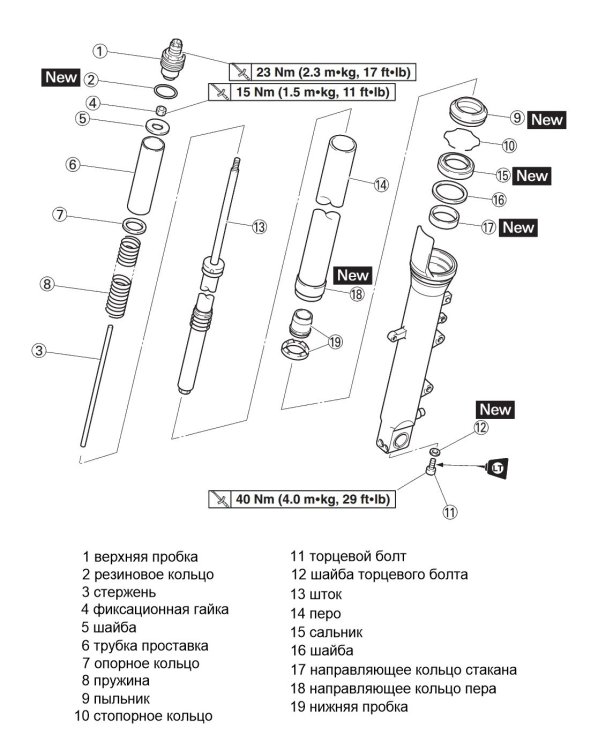
To replace the seals, it's recommended to fully disassemble the fork. This lets you drain all the old oil, remove dirt and check the parts for wear.

Important points:
- A lot of oil will drip during disassembly, so prepare containers, gloves and rags.
- The manual recommends replacing rings 17 and 18 at every disassembly, but experience shows that if they are in normal condition, replacing them isn't necessary.
- It's recommended to break loose and tighten end bolt 11 with the outer tube clamped in a vise and damper rod 13 held with a special tool. If you don't have a vise, you can use the method shown in the video.
- It's recommended to knock out the seal with the outer tube clamped horizontally in a vise. Oil will spurt out through the end bolt 11 hole, so cover it with a rag.
- Take care when fitting the new seal. If it is scratched or damaged, it will start leaking very quickly. It's better to use a special fork seal driver.
- Carefully control the oil level in the fork. If the legs have different amounts of oil, the fork will work incorrectly.
- Be sure to replace the spring if its length is below the limit (see the manual for the exact value).
- Wash the parts thoroughly if there is dirt.
- Check the fork tube surface. If there is rust pitting or deep scratches, there is no point refitting the tube: the seals will leak anyway. In that case the tube must be replaced.
Recommend