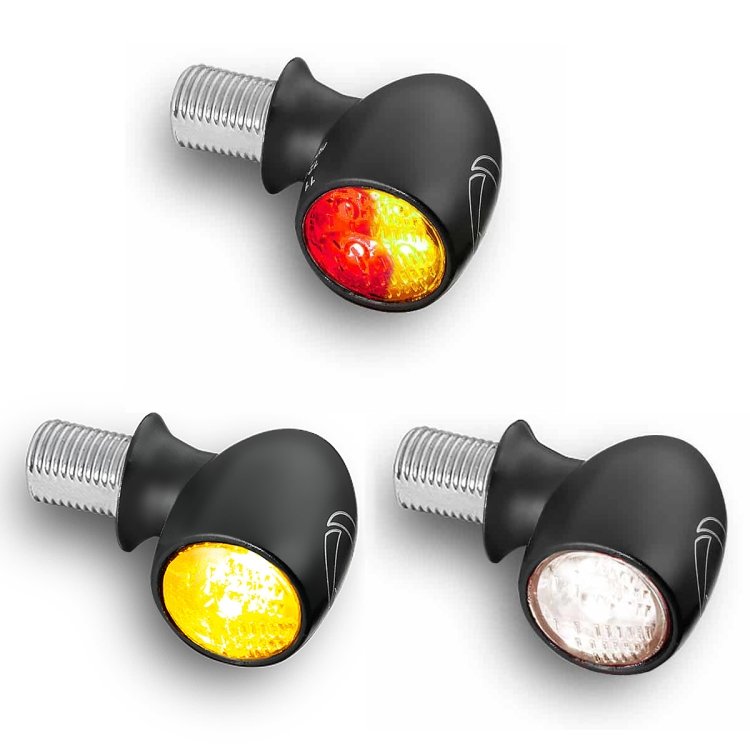
8x Kellermann ATTO on a Street Glide
We chose the Street Glide over the Road Glide because it is less bulky and looks more like a motorcycle, thanks to the visible steering head and the more compact fairing. This is especially noticeable on the updated Harley-Davidson touring platform, which has become visually “lighter”, more compact and less cluttered.
One way to lighten the look even further is to remove the taillights, which are large on their own and also merge the saddlebags and the rear fender into one bulky piece.
You could move the indicators to the saddlebags, but they would be noticeable there.
We decided to install the most compact and ultra-bright indicators on the market — Kellermann ATTO. On the bike they are barely visible, as if there were no taillights at all, yet they shine brighter than the stock ones.
During installation we found that the rear fender has five factory holes left from the mounting studs of the original taillights. The holes look ugly, so they need to be plugged — for example, with ATTO DF (3-in-1) indicators.
A pair of these indicators fully replaces a taillight with turn signals, because each ATTO DF combines a position light, brake light and turn signal.
The fifth, lowest hole is covered by a chrome stiffening bracket, which we didn’t dare to drill. So we installed four indicators on each side and closed the lower hole with a rubber plug.
The video shows the installation process. Turn on the subtitles to see detailed comments on each step.
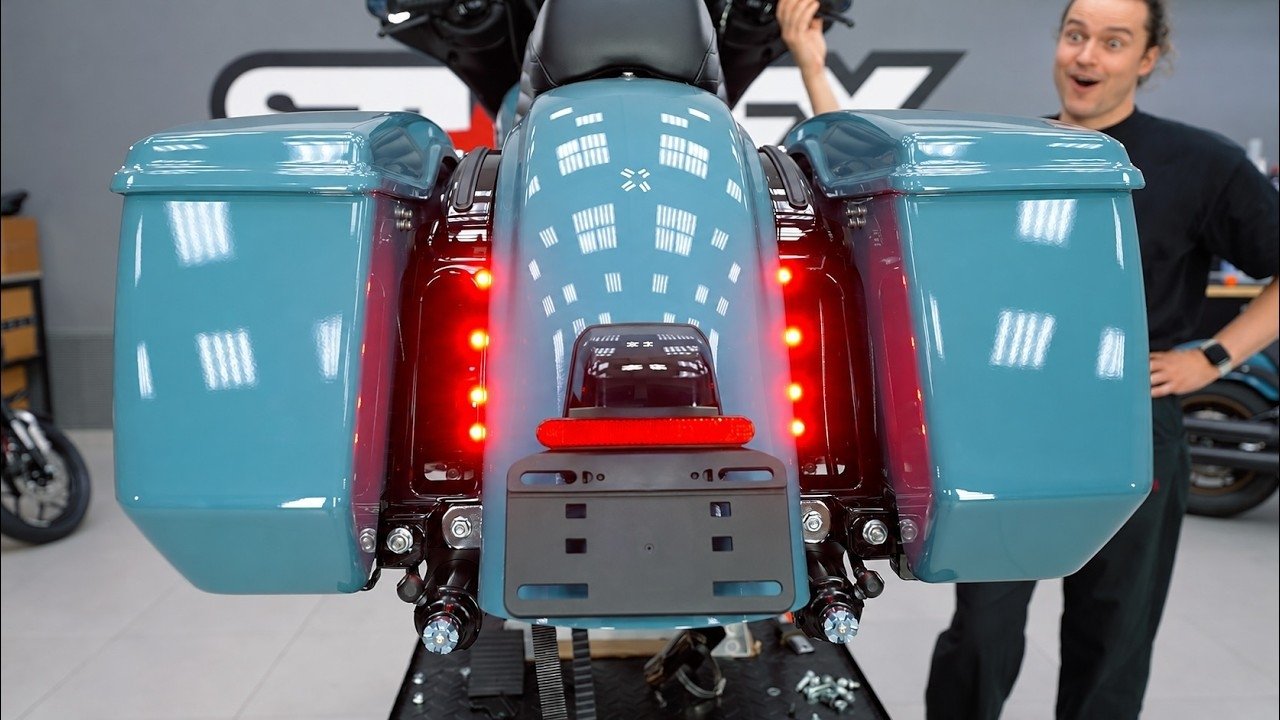
- 00:04 Street Glide 2024 with stock taillights.
- 00:29 Removing the lower stiffening bracket.
- 00:54 Removing the stock taillights.
- 01:21 Kellermann ATTO DF “3-in-1” indicators.
- 01:30 Installing the ATTO in the rear fender.
- 02:18 Protecting and routing the wires.
- 03:16 Connecting via feed-through terminals.
- 03:54 Kellermann ATTO on the Street Glide 2024.
- 04:15 ATTO brightness compared to the stock taillights.
Installing the ATTO came with a few challenges:
- The diameter of the indicator’s mounting base almost matches the hole in the fender, so the indicator doesn’t sit tightly. To center it precisely and securely, we used rubber O-rings with a 2 mm inner diameter.
- The heat-sink nuts are very compact and nicely made: they just barely fit in the space between the wheel and the fender. But the swingarm is not rigidly fixed and the wheel can shift sideways, so we secured the indicators with the compact nuts included in the kit.
- In terms of cooling, heat sinks are not needed when mounting to a metal part — the fender itself works as a heat sink. Heat-sink nuts are useful when mounting the indicators to plastic parts that don’t dissipate heat.
- With four indicators on one side you end up with a harness of 16 wires. They can be combined into four using splice connectors, but we left them as they are and connected them via feed-through terminals. This is much simpler and easier to repair.
- It’s a good idea to cover the exposed wires where they exit the indicator stud with hot glue: it protects them perfectly and is easy to remove if you need to unscrew the nut. We recommend using adhesive-lined heat shrink — it won’t slide, and the wires will most likely stay covered. We used regular heat shrink, so the wires became exposed and we had to protect them with glue.

On the new touring models the LED indicators work properly: correct flash rate and no errors. We also tested with a single indicator — no problems either.
Functionally, everything is great: the new lights are blindingly bright. It’s important to aim the beam correctly so as not to blind the drivers behind you.
The video doesn’t convey this: the beams shine straight into the camera sensor, overexpose it and make it impossible to set the exposure properly. In the video, when the brake light comes on, the very center of the indicator looks white or orange, but in reality it isn’t — the color is deep red.
Visually it looks awesome! With the ignition off, it seems as if there are no taillights at all: the saddlebags look like they are floating in the air, and you can even see the rear shocks.
When the lights are on, the motorcycle looks like a spaceship. With just one pair of indicators, there would be no such effect.
We’d like to highlight the excellent product from Kellermann:
- The ATTO are incredibly small, yet very durable and ultra-bright.
- The stud is made of steel, so it’s hard to strip its thread.
- The stud is short, but long enough, and together with the flat nut it makes for a very compact mount that fits in tight spaces.
- An unusual lens with protruding reflectors.
- The wires are very thin, but strong and flexible.
- On closer inspection, the product looks like a work of art: very solid yet composite, with precise but smooth lines, beautiful laser engraving and clear glass through which you can see the LEDs.
It’s amazing that such a tiny housing contains a microchip that controls powerful LEDs and ensures the highest reliability and service life.
Our store stocks almost the entire Kellermann range, including the ATTO. Kellermann specializes in LED lighting technology; you can learn more about the manufacturer on the brand page.
We’ve opened a discussion on the forum where you can talk about this topic.